Thursday, 24 October 2013

SharePoint 2013 Open with Explorer- credentials pop-up

The following instructions will need to be carried out via a local or domain administrator on the local machine to eliminate the error:
1.   Click Start, type REGEDIT in the Start Search box, and then press ENTER.
2.   Locate and then click the following registry subkey:
HKEY_LOCAL_MACHINE\SYSTEM\CurrentControlSet\Services\WebClient\Parameters
3.   On the Edit menu, point to New, and then click Multi-String Value.
4.   Type AuthForwardServerList, and then press ENTER.
5.  On the Edit menu, click Modify.
6.  In the Value data box, type the URL of the server that hosts the Web share, and then click OK.
Note You can also type a list of URLs in the Value data box.
It should look similar to the window below.
  7.  Exit Registry Editor.
  8. You will now need to restart the WebClient service on the users workstation so that the registry changes can take affect – can be accessed via the services.msc snap-in.
Organization Distribution Options -
To distribute the following registry entry you could either,
1. Export the registry entry and save it as a .REG file, and then import it on each workstation manually, or
2. You could push out the .REG file using Group Policy as a GPO, or
3. Deploy it across the organization using Group Policy *
*The 3rd item above is the recommended option, and can be done by an Active Directory administrator using the registry wizard in the Group policy Management Console GMPC
Outcome -
The above solution will resolve the issue on end user workstations providing that the SharePoint websites are correctly added to the local intranet zone in Internet Explorer.
If you read this article in hopes of figuring out how to get this working on a Windows Server 2008 machine, you will need to first uninstall the IIS7  WEBDAV feature, and then install the Desktop Experience feature on your server (requires reboot), however these changes do not affect end users as the Open in Explorer option relies on the WebClient service on the end users workstation.

Windows Explorer View- SharePoint 2013- Be careful!

Ok maybe it’s not that drastic, but Explorer View unchained can cause problems in your environment. Let’s start with the basics and discuss why Explorer View can cause serious headaches.
There are three ways to upload and manage documents in SharePoint:
  1. Directly via Web Interface – Good!
  2. Via a SharePoint Aware Application (Office/3rd Party Solutions) – Good!
  3. Directly via Explorer View (WebDAV) – Not Good. 

Explorer View has few merits

There are very few reasons Explorer View is good, but most of them can easily be dismissed.
People may argue –
  • Users are familiar with the interface

Who cares? Bad interfaces have existed before, and will continue to exist. Just because your user is familiar with the interface doesn’t make it good.
  • Offline Syncing (aka – SkyDrive Pro is amazing)

It’s very hard for me to argue against this. I like SkyDrive Pro. Having a local sync’d copy at all times for specific Document Libraries is great. Unfortunately, SkyDrive pro does nothing to encourage users to check-in or add metadata, and for these reasons I think SkyDrive Pro, like Explorer View, has the potential to cause problems your SharePoint environment.
  • Explorer View makes moving multiple items easy

Unfortunately in SharePoint 2010, managing content has its drawbacks, and often Explorer View is the best out-of-the-box option to reorganize. I must stress though, the end-user should be well informed before using it.
Have you ever had an end-user copy a folder from inside a document library into the root of a site? Sure it looks the same, but all of a sudden you have a sub site without a template housing documents that are still within the source document library. In SharePoint, you see the folder inside of the document library. In Explorer View, you see it at the root of the site. Confused? You should be.
Explorer View should be used sparingly. Explorer View should be used only by administrators and trained power users.

Explore View is more bad than good

I don’t know how to say it better than this: Explorer View in the wrong hands is that mistake in life that can cost you everything. It is akin to texting and driving – a situation where you may get away with it a few times. In the case of using Explorer View things may seem ok but eventually, EXPLORER VIEW WILL RUIN YOUR SHAREPOINT ENVIRONMENT.
Here’s why -
  • Metadata

When you upload a document via Explorer View, regardless of if metadata is required or not, there is no prompt and the user has no idea.
Allowing users to upload documents without metadata completely undermines the sole purpose of SharePoint.
  • Versioning

Want to view a document’s version history? Not in Explorer View. Sure, once you open the file in Office you’ll see the versioning console (if you look under the ‘File’ tab), but now we’re assuming that it’s an Office document.
What happens as a result? Users start saving “V2″ and “V2-final-final” copies again, completely undermining SharePoint.
  • Check In/Check Out

There is no notification of a document’s checked in/out status via Explore View. It is not until you open the document that you are prompted to check out or told someone already checked it out.
WORSE THAN ANYTHING ELSE, if a library has a required field and a user uploads the document via Explorer View, the document remains checked-out. This means no other user will see the document in SharePoint (regardless of view) and the person uploading the document has no idea. None.

The Solution:

  • Microsoft – It’s been 13 years. Please fix Explorer View.

  • IT - Train your users. Embrace the technology.

Training is your job. Sorry. If you see a person turning their computer off by pulling the power plug, you’ll stop them. If a user is using SharePoint via Explorer View, stop them. At the very least, explain the benefits and train on the hindrances.
  • End User - Don’t hold on to old technology.

Have you used an outhouse recently? Did you paint your room with leaded paint? Of course you didn’t. Technology improves with time. Explorer View is 13 years old and is holding you back. Embrace SharePoint’s power. Using SharePoint as it is intended will make you love it instead of hate it.

Wednesday, 7 August 2013

SharePoint 2013 Workflow to set Title field automatically

There are times where you need SharePoint to set some properties of the file/item automatically for you. For some scenarios you could use metadata with default values for file/items columns. For other scenarios you need a workflow to populate the item's columns e.g Title.

It could be a variety of reasons why this might be the case.
Some of the reasons could be:

  1. to overcome the limitation of SharePoint losing file/item's built-in properties 'Created', 'Created at', 'Created By' or other metadata on file/item move to another repository
  2. to be able to take advantage of functionality that does not allow use of built-in properties or GUID e.g. Labels in Information Management Policy
In our scenario, users expressed that they want some naming convention for their files. They also mentioned (having worked on a File Server for years) that sometimes they do not know where the file belongs to, who has originated it and how old is the file. Well we cannot rename file names of the files users create/upload into SharePoint. Files can come from the variety of sources. They can be downloaded from other applications with meaningful names already there. We do not want the frustration of users shouting at us saying 'I cannot name the file as I want'.
For this instance, we want something that will happen in the background (on top of the user specifying file's metadata)

To create a 'permanent sticker' that will stay always as an attribute of the file in the Title field, we need to develop a workflow, that will automatically set the item/document's title based on the attributes we want. We do not want the workflow to run on an item/file change since we want to capture its attributes only on creation. This specification can be defined on the Workflow Settings page in SharePoint Designer.

Currently, BoostSolutions offer a similar solution and charge $500 for it. I have developed the workflow myself and it works flawlessly.

If you do not have access to Visual Studio and/or your programming skills aren't very good, you can use SharePoint Designer to achieve what you want. Using SharePoint 2010 Workflow Platform, I developed something like this:


Starting: First, you starting your workflow and logging that the process has actually started (good practice for troubleshooting).

Set global Variables: For our Auto Populated title, we want build-in attributes that can be lost on file migration to be included. Therefore we set up global variables MyCreated to copy Created data and MyCreatedBy to copy Created By attribute. We respectively log this to the workflow history so we know if the steps have actually took place.

Processing: The file created may not have a Title in it (default behaviour). We then want to set the title field to the string: 'Created on Variable:MyCreated by Variable:CreatedBy in specific location'

If the Title is already there (e.g. the file uploaded to SharePoint has a Title already or the user, while creating a file types the title in Document Information Panel), we want this Title to be copied to the workflow's variable and changed to the workflow's variable containing the string we want to appear in the Title field (MyTitle2 in this case).
Similarly, we have to log every action so we know what is happening whilst the workflow is proceeding.

Complete: Then we complete the workflow and log that in the workflow's history.

If for some reason the workflow does not complete, is stalled, stuck at 'Starting', 'Processing' or whatever, click on the link saying 'Starting', 'Processing' etc. and you will be taken to the workflow history.
You will see the respective steps of the workflow as they happen one after the other (since we are logging every step). If you see, that the workflow is not progressing to the next step required in the sequence, then troubleshoot that step in the workflow. After you've done this (or on every update to the workflow), make sure you update and publish the workflow so the changes are pushed down to every list/library associated with this workflow.

In my case, you can see the workflow history logging every step as they should happen:

New File - No Title (default behaviour):


 New File with Title in it or specified by the User on creation:


I tested it with another user too and it worked flawlessly.
Now you can use this workflow as a template or as a global workflow which you can download for every site and use for every list/library you want (amending the string in a Title field to hold info relevant to the location of the file).

Stay tuned for more SharePoint 2013 in practice!

UPDATE:

You will have to update your workflow in order for it to work on 'Check Out-Check In' enabled lists and libraries.
You just need to check out and check in the file in your workflow process. My changes to check out and check in items will be universal as I will modify the workflow commands to apply them to the 'Current Item', so I can use it globally, as opposed to the list the workflow is running on. Here are the steps required to take: [re-blogged from Kim Frehe post available here]:

#################################################################################

A modification to the .xoml file that tells the workflow to use “this item” regardless of the list.
Disclaimer: If you want to model an out of the box workflow, always copy and modify…it is never a good idea to modify the out of the box global workflows directly.
Steps:
1.    Set up your workflow with placeholders for your check-in and check-out actions.
2.    Add “Check out item in this list” and “Check in item in this list with Comment” actions to the appropriate steps on your workflow.
a.     Do not select a List. Leave the “this list” as is.
3.    Save your workflow.
4.    Go “All Files”, “Workflows”, click on the workflow name in the window below “All files” so that your workflow displays it’s files in the window on the right side of the screen.
      5. Right click on the .xoml file and click “Open With”, “SharePoint Designer (open as XML)”
      6. Click Ctrl+F to find “CheckOutItemActivity”
7.    In that row you will see: ListItem={x:Null}” ListID=”{x:Null}”
8.    Replace “x:Null” in “ListItem=” with “ActivityBind ROOT, Path=__item”
9.    Replace “x:Null” in “ListId=” with ActivityBindROOT, Path=__list”
10.  Click “Ctrl+F” to find “CheckInItemActivity”
11.  Repeat steps 8 and 9 for this line item. 
12.  Save this file.
13.  Click on “Workflows” and click on the workflow name to open the workflow file as you normally would.
14.  Do not make any changes but click “Save”
15.  When Designer pops up to say that a different version of the .xoml file was saved, and politely asks if you want to replace that file with this one click “No”.
16.  Close Designer and re-open it
17.  Click on “Workflows” and click on your workflow to open and edit it.
18.  Find the step where you checked out and checked in the item.

The action should say “Check out item in Current Item” and “Check in item in Current Item with comment: xxx”


Copyright Kim Frehe
#################################################################

When you configured your .xoml file correctly you should see your 'Check Out' and 'Check In' placeholders updated to 'Current Item':






Wednesday, 31 July 2013

SharePoint 2013 Group Calendar limitations

In my situation, after successful configuration of Outgoing and Incoming e-mail, I was able to send e-mails and meeting requests from my Outlook to SharePoint libraries and lists, including SharePoint Calendar.
Everything worked except meeting requests to the calendar sent via e-mail . They were successfully delivered to the Events' List but not showing up in the actual Calendar.

I knew that it was nothing to do with my e-mail configuration. The messages WERE DELIVERED. I focused on SharePoint and discovered that if I switched off the option of 'Use this calendar to share member's schedule' in Calendar Lists's Settings (List name, description and navigation), a meeting request I would send to the Calendar via its e-mail address would show up in a Calendar View.

Do not worry, you are not loosing a lot by setting NO to 'Use this calendar to share member's schedule'.
Microsoft's Article on Group Calendar will tell you all the beautiful bits you can do with this option. It will not tell you though that once you add people to your 'Share Calendar' and navigate away from the page or refresh it, you will loose the users you have just added. You will have to add them manually again! Strange!

Here is my situation:

'Shared Calendar A' is the main departmental calendar on a home, top level page in the site collection with overlays for other calendars in different sites (department functions) within this site collection.

Currently, when a User1 adds an item to the 'Shared Calendar A' (group option switched off), it will show up to User2 when he opens up the 'Shared Calendar A'.

When a User1 adds an item to a 'Function Calendar A', it will show up in an overlay on the 'Shared Calendar A' JUST FOR this User1.

Similarly, when a User2 adds an item to a 'Function Calendar A', it will show up in an overlay on the 'Shared Calendar A' JUST FOR this User2.

So far, we have established that overlays work only for the current user.
It would be useful if users could see each other's (colour-coded?) calendar items (overlays) for each function in the department's 'Shared Calendar A' just as if the Group Calendar option was switched on.
Somehow, we have to replicate the functionality of a group calendar without using OOTB 'Group Calendar' function of SharePoint Calendar because we want items sent by e-mail to display in the calendar!
What if every item created by any user in any 'Function Calendar' within site collection was copied across to the 'Shared Calendar A' automatically so everybody can see it? ! I'm not sure about colour coding though- it might not work but logic is definitely there.
I know what you say: Workflow! But not a basic workflow. To copy items across sites in a site collection, you need a Visual Studio. You cannot develop such a workflow in SharePoint Designer for example.

But wait a minute... Will it not be confusing for the user who will see his/her coloured calendar overlays in their view of 'Shared Calendar A' along with a blue duplicated item copied to a 'Shared Calendar A' from a given 'Function Calendar'?

Maybe we should look at the situation from a different angle?
How about switching a 'Group Calendar' option back on, what would mean:
  • loosing automatic display of items sent by e-mail to the calendar, but:
  • colour coded calendar overlays would work on a 'Shared Calendar A' for the whole group of users ONLY IF you add a user to the group calendar (note: that user will be stored there temporarily)
..and then manipulate the views to show events items in a calendar list (it must be a way)!

As of manipulating the views, I found this Laura Walker's reply to one of the questions posted on a SharePoint forum:

'When you defined the calendar view, which options and fields did you select for the Columns section of the view definition? Did you use a single date field or the interval option? And for the selected date field(s), is/are the field(s) required? And is/are the field(s) for the missing items populated?

(...)Try checking the portion of the view definition. Perhaps the view has the wrong columns setting.

And here's another test to try. If you have date fields of beginning date and end date, and you define the calendar view to show items in the range of end date to beginning date (instead of from beginning date to end date), you can also make some items not show up. In fact, the only
items that DO show up in this case are the ones where end date and beginning date are BOTH populated and have the same value. If end date is left blank, the item is excluded from the view. And if the end date is later than the beginning date, the item is excluded from the view
'.

Let's investigate:

Properties of the item visible in a Calendar View


Properties of the e-mailed item showed in 'Events' list but not in Calendar View


Do you see what I see?
Once I edited the event not showing in a Calendar View to include 'Attendees', that item miracleably appeared in the Calendar.
In addition, the column 'Function' was a metadata column which was set to required. I changed that so now it is optional.

Now, it is time to investigate the issue of Attendees and other columns in an e-mailed Meeting Request!
I removed 'Required' from any column both for Schedule and Event content types. This eliminates the situation where the item would not be saved to the calendar due to Outlook not populating every field required. Plus, as mentioned before, I deleted a Metadata column from Schedule and Event content types as sometimes metadata does not play well with other functionality in SharePoint.
IT STILL DOES NOT WORK! Events are stored in 'Events' List but not showing up in Calendar View.

I clicked 'Edit Properties' 'of the item stored in Events but not showing up in Calendar View. It does not show my Attendees but in Outlook I have 3 of them (inc. this SharePoint Calendar) for the same item. The Attendees field is not required so it should not be much of a problem at least in one aspect.
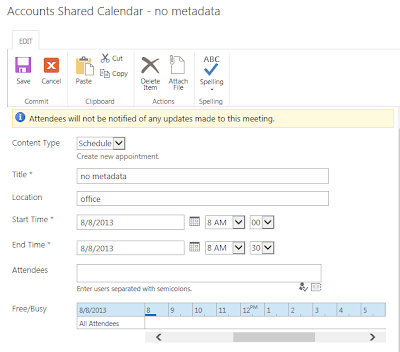
For the time being I focused on the dropdown for a Content Type- Schedule vs. Event:


We know that by populating the 'Attendees' field in the Schedule form, the item will be included in a Calendar View. To further investigate potential causes of the problem, let's connect this SharePoint 'Shared Calendar A' to an Outlook personal calendar and see if dragging and dropping such an Outlook generated item from personal to SharePoint calendar would in fact populate a SharePoint Calendar view.
(If you are an Admin of the site and your 'Connect to Outlook' button on the ribbon is disabled, refresh the page and try it again or copy the Web Address of the Calendar from its settings page, paste it in the address bar on another tab and try connecting to outlook again. This issue is most probably caused by a 'Minimal Download Strategy' feature enabled on a site level'.)

So, once you connected your SharePoint calendar to your Outlook, just generate a new appointment in your personal calendar and drag & drop to copy it to the SharePoint calendar like this:


First thing I saw was:


Then I noticed:


Despite that, the item was displayed in a 'Shared Calendar A' calendar view with the prefix 'Copy:' to it. See below:


I ignored a personal calendar in Outlook on the left and created a Meeting Request as a User1 in a connected SharePoint 'Shared Calendar A' on the right without adding a 'Shared Calendar A' e-mail address to the list of attendees. I only added a User2 as an attendee.


On MS Help Forum I found that:

'This error refers to the fact that a SharePoint list calendar isn’t capable of tallying responses.  SharePoint list calendars by design do not tally attendance.  In order to tally responses you would need to use a Meeting Workspace.'

Mind you a Meeting Workspace has been depreciated in SharePoint 2013 :)

I sent it anyway. I then logged in as a User2 to whom I just sent the request and accepted it. Nothing happened for a while.
After User1 clicked 'Send/Receive' in outlook, the User1 (originator) could see the item in 'Shared Calendar A' on a SharePoint site.
User2 could not see his meeting that he/she just accepted in SharePoint calendar view, but it was visible in 'Event List' (so same problem here).
User2 could also see his accepted meeting request in his/her personal calendar in Outlook! If User2 would drag and drop this meeting into his connected SharePoint 'Shared Calendar A' in Outlook, this item would appear in a calendar view in SharePoint with a prefix 'Copy:'

It is called a seamless integration, isn't it? I just cannot wait until I would have to explain to my users what they can and can't do between SharePoint and Exchange! (not!).

Going back to the issue of e-mailed meeting requests not showing in Calendar View but only in events List- i am not giving up!

I deleted the 'Shared Calendar A' as it might have been a custom list (created from a template used elsewhere). I then cleared the recycle bin and went back to the main root page of the site collection. I added an app being a calendar, enabled 'Group Calendar' option and added an e-mail address to the Calendar List.
Same problem - items are sent to the Event List but are excluded from the Calendar View.

I started recreating the Overlays and out of curiosity, I started from the Exchange Overlay (for auto syncing your personal calendar).

[side note _________________________________________________________________________

You need a web access to your Outlook (OWA), please see MS Article describing the process as well as its limitations [e.g. works only with a user who is currently logged on].

When you successfully created an Exchange overlay in your SharePoint Calendar, you might see events shown in a 'Free/Busy/Tentative' format like that:


This is caused by the default setting for the account in Outlook. In Office 2010:
Go to File -> Options -> Calendar -> Calendar Options (section) -> Click 'Free/Busy Options' button and change the Read options according to your preference, e.g. 'Full Details'
Note that this Exchange overlay in SharePoint is just a projection of your OWN, personal calendar in the Exchange and you cannot edit items shown in this overlay in SharePoint.

In addition, if it happens that the User2 has his Exchange overlay configured on his 'Shared Calendar A' and you (User1) try to add that User2 to the Group calendar to see his/her schedule you will receive this error:

'E-mail address is empty. you should set Exchange e-mail address into your user profile to retrieve calendar data from Exchange server'

It looks like the functionality breaks when you attempt to add another user.
To summarise, it is not a proper overlay of calendars like with other calendars within SharePoint. It is just a raw display of Exchange items with which you cannot do anything.

_____________________________________________________________________end of side note]

Anyway, an Exchange Overlay was done just as a proof of concept. Maybe someone, somewhere would have a requirement for it.

Let us go back to the request items sent via Outlook not showing in Calendar view as we did not resolve that, did we?
We have managed to deepen the problem after we deleted the old 'Shared Calendar A' and created a new one from scratch from a default calendar app in SharePoint! Now, when you add an item to the calendar (no matter how, via 'Add' link on hover, 'New item' from the ribbon or 'New item' from Content and Structure), nothing happens in the Calendar View (tested with multiple browsers). Everything goes into 'Event Lists'! WTF!
Ok, an 'Event' Content Type does not seem to work so I added a 'Schedule' Content Type to the calendar list and created a new Schedule item. It did go to the Calendar View.

In summary, I committed this diagram to graphically attempt to explain this wonderful integration between SharePoint 2013 and Outlook 2010:


I am moving to something else, watch out for updates on this post as I am not giving up!


Monday, 29 July 2013

SharePoint 2013 Incoming and Outgoing E-mail

The configuration of Incoming and Outgoing e-mail in SharePoint 2013 should be a simple task. Well, on paper.
In our scenario, we could not take advantage of the Site Mailboxes- a cool new feature of SharePoint 2013 which to some extent enriches the functionality of Incoming e-mail configured on List/Library level. In order to use Site Mailboxes, the requirement was to use an Exchange Server 2013. Since we own an Exchange 2010, we proceeded with configuring Incoming and Outgoing e-mail features.

#################################################################################

SharePoint 2010/13 allows you to leverage Active Directory Domain Services (AD DS) so that contacts that are created when you email enable document libraries or lists are stored in a designated Organizational Unit within your AD DS infrastructure.  So why would you want to enable Directory Management Service?  Purely for the fact that by storing these contacts in AD, you are allowing your users to locate email enabled libraries and lists easily from within their Outlook Address book.


Copyright SharePoint George blog
#############################################################################################

We will not configure such a Directory Management Service in our production due to a simple reason. It is impossible to define a number, names and specifications of our lists and libraries. The system is going to be developed in instalments and every department will be responsible for their own site. Users will either simply know the e-mail address of the list/library, it will provided on pages (object descriptions) or it will be stored in their Outlook sent history. Storing these e-mail addresses in AD would be difficult to manage and would require a constant input After all, the features are pretty powerful in their own limitations (? strange saying) and enable the following if configured in an automatic mode:

Incoming E-mail:

  • Lists and Libraries can be assigned a unique e-mail address for users to send e-mails and attachments to without even opening SharePoint site:


In the example above, the user has sent an e-mail 'Another test' and CC'd this SharePoint Library by adding its e-mail address. The e-mail does not have to be CC'd. It could be sent directly. As you can see, the e-mail has been stored in the library. Similarly, if the user attached a file to his e-mail, it would have been stored in the library along the actual .eml file.
You can group these e-mails and attachments in folders, sort them by e.g. sender etc. Everything is configured in List/Library Settings under communication heading (Incoming e-mail setting). 

Outgoing E-mail:
  • Alerts- users can set up alerts on List, Libraries, Documents, Discussions and can be notified by e-mail about any changes to the object


  • Admin messages- Admins can receive e-mails with access requests and can respond to them:
 After navigating to a site/page that a user has no access to, he/she is presented with the following form:

Once they provide the reason, they will see:


When Outgoing e-mail functionality is configured correctly, the admin should receive an e-mail notification with the above access request details and from there, he/she can approve/reject the request or continue the conversation. 


The Incoming and Outgoing e-mail in SharePoint can be configured on a Farm and Web Application level. Web App level overrides settings of the Farm Level.

Very good guides outlining the steps of Incoming and Outgoing e-mail configurations in SharePoint 2010 (applies to 2013 too) are SharePoint Goerge's posts: Incoming e-mail & Outgoing e-mail.

In my organisation, where we have just one SharePoint Server installed on Windows Server 2012 Datacenter, we already had an SMTP Service running. We needed to create Send Connector and Receive Connector on the Exchange Server and apply the settings in Central Admin.

After all the relevant steps were performed, we could start to send e-mails to and from SharePoint 2013 with no issues.

It is all good, like I said- on paper. In our case, the Incoming E-mail settings worked just fine as we used a Virtual SMTP Server (service on our SharePoint WFE), created Exchange Send Connector and enabled Incoming Mail features on the farm level in SharePoint. We could successfully send e-mails and attachments to e-mail enabled SharePoint lists and libraries.
For some reason, the Outgoing E-mail does not work. SharePoint as of then was unable to send alerts for users and SP_Admin did not see access requests to sites sent via e-mail. We had to troubleshoot that...

Having found the resources like:


I learned that there is a certain procedure of troubleshooting Outbound e-mail in Sharepoint.
What I did was to test a connection to my SMTP Server using Telnet. It all went good. I restarted a SharePoint Timer Service on my Windows Server where SharePoint is installed on. I then deleted all the alerts on any libraries and made sure users have properly set up e-mail addresses. I left the system for a night, meaning application pools' would recycle and all the 'housekeeping' would happen over night.
In the morning, I double checked my settings for Outgoing E-mail in SharePoint Central Administration. All seemed to be fine. I logged in as User1 from a client computer and created an alert for one of the libraries. I noticed an immediate e-mail in my inbox confirming successful setup of my alerts:


I knew it is a breakthrough! :)

I then jumped on another machine via RDP, logged in as a System Admin, added a document to the library that the User1 has an alert on, switched back to the User1's machine and BANG! Found something in his inbox:


Remember, it could be lots of issues causing SharePoint to not send outbound e-mails. From not establishing a connection to an SMTP server, database timer locking, firewalls to wrongly configured lists or libraries. 

As usual- stay tuned for more updates of SharePoint 2013 in production!


Wednesday, 24 July 2013

SharePoint 2013 SSL Certificate configuration

I found a great post of Tomas Balkestahl, in which he discusses the steps of configuring SSL and Alternate Access Mapping in SharePoint 2013.

In my scenario, as of now, the SSL is needed to secure a connection to the SharePoint apps that we intend to download from the SharePoint store. We opted for a wildcard certificate since every App generates its own URL that needs to be secured.
We have no Web Application for the apps yet. It will be created at a later stage and there will be no separate domain for the apps too. The business requirement was to secure the main company domain with the wildcard certificate hence we isolate apps in a different Web Application and keep their sites in restricted zone.
[To start with, you could not host your apps on a Web application with Alternate Access Mapping configured. It looks like now, you can! ]

#################################################################################

One of the feature updates of the March 2013 Public Update for SharePoint 2013 enables you to use multiple app domains in SharePoint 2013 environments with alternate access mapping or host-header web application configurations. For more information, seeEnable apps in AAM or host-header environments for SharePoint 2013.


Copyright: Microsoft Corporation
#################################################################################

So, for the time being, we just installed an SSL Certificate on our main Web Application used for portal and configured it to use HTTPS only. The same procedure would have to be repeated with every other Web application we have or we ought to have.

If you follow the steps in the post of Tomas Balkestahl you will be able to find out how to install an SSL Certificate and configure bindings.
In my case, the SSL Certificate was installed for me and the binding were configured as well:


I had to set up AAM in SharePoint 2013 for a given Web Application and configure a local machine to access the HTTPS sites.

Central Administration -> Configure alternate Access Mapping :

#################################################################################

-
httpsAAM1x
5.2 Next thing we want to do, is to alter the existing Public URL so that it uses https instead of http. Since all else is ok, add the s…
httpsAAM2x
5.3 Ok on that will give you this view, note that both the Internal URL and the Public URL has changed. This site is now only accessible by the https protocol. (Not entirely true, but true enough)
httpsAAM3x
5.4 I always like to be able to type in the default http URL in my browser, and if the site uses https, be redirected automatically. This is rather easy to do in SharePoint, simply add an Internal URL using http and add it to the Default zone which will direct us to the Public URL using https. It may sound difficult but trust me, it just works.
If you are interested in Learning more about Alternate Access Mappings and the inner workings, I have a free whitePaper published on the subject for 2010 Here and a basic post for 2013 Here.

Anyways, click on the Add Internal URLs link and simply add the same URL using http, make sure that the default zone is selected.
-
Note: The zones used in AAM has NO RELATION with the zones in Internet Explorer, they are named similar, but they have no connection whatsoever.
httpsAAM4x
5.5 Now the list should look like this, note that you have http and https on the left (incoming traffic) and only https on the right (target):
httpsAAM5x
You are now done configuring your Alternate Access Mappings!

Copyright Tomas Balkestahl

#################################################################################

The above procedure will indeed get HTTPS protocol to work. It will not however automatically redirect HTTP requests to the HTTPS. Instead, users will see HTTP 403 Forbidden error.

Stay tuned to see how I have tackled this!